Notmuch E-Mail with Emacs, mbsync and friends
17.04.2025 PermalinkIntroduction
Over the course of a workday I receive plenty of mails, many are notifications regarding tickets, commits and the like. Some are calls for help that require a response on the same day.
For more than ten years I used Thunderbird on Linux for mail and scheduling, and it worked ok for me. Nevertheless there was room for improvement:
Each incoming mail is a potential interruption of whatever I'm busy with. I don't like to be bothered by tens of desktop notifications each day, let alone audible signals. On the other hand I'd like to see if there are unread messages without having to switch into a mail client. I tried Birdtray to place some reduced, non-intrusive information onto my desktop bar, but it didn't satisfy me.
I work for several clients and projects and it is important for me to have a distinct mail folder for each. Thunderbird offers message filters that automatically sort messages into folders, which had great benefits for me. However, a somewhat simpler and more flexible approach I prefer is automated tagging.
For me, searching for mails in Thunderbird feels cumbersome and slow.
I make extensive use of Emacs Org mode for task management and I wanted a seamless connection between todo items resulting from a mail with the mail itself. I consider a mail as read as soon as at least one todo item points to it. This leads to Inbox Zero which seems to me like a perfect addition to a GTD style of productivity management.
The Org agenda can display diary items, but my appointments are stored in systems that provide scheduling data in iCalendar format, so a conversion would be very welcomed.
I like the idea of having mails as plain text files, which enables automated processing with simple scripts.
Meet the team
After some research I got a list of some components that promised to satisfy my requirements:
- three new folders in my home:
~/Mail,~/Calendarand~/Contacts, - the mail indexer notmuch and its Emacs package as a frontend,
- mbsync and mpop to fetch mail from IMAP and POP3 servers,
- msmtp to send mails via SMTP,
- vdirsyncer to synchronize calendar and contact items with iCal servers,
- pass for password management and provision, and
- systemd for scheduling.
You can see that there are quite some pieces needed to form an open E-Mail system that can be used with Emacs. Compare this with a one-stop-go solution like Thunderbird, which, btw, I still need for scheduling appointments with colleagues. Nevertheless, it was worth the effort to now have my mails in Emacs, because I can operate on them very quickly using only the keyboard.
And I like the Linux/Unix approach of having composable tools, each having a single purpose and being good at that. Each piece of the puzzle can be understood and tested separately using the command line.
What follows is a description of how to configure these tools so that they work together nicely. We'll start with the folder organization and the overall service management and then look at each piece in more detail.
Folder organization
My ~/Mail folder contains a main folder
for each account, plus some special folders:
Mail
├── .notmuch
├── archives
│   └── private
│       ├── This
│       ├── That
│       └── Anything_Else
├── drafts
├── templates
├── falko.riemenschneider@arcor.de
│   ├── Archives
│   ├── Drafts
│   ├── INBOX
│   ├── Junk
│   ├── Sent
│   ├── Spam
│   └── Trash
├── falko.riemenschneider@gmail.com
│   ├── Drafts
│   ├── INBOX
│   ├── Sent
│   └── Trash
└── info@falkoriemenschneider.de
   ├── Drafts
   ├── INBOX
   ├── Sent
   └── Trash
The .notmuch folder contains three
shell scripts, so called hooks in notmuch parlance. I cover them
in the notmuch section below.
My mail signatures are simple .txt
files which I also keep in ~/Mail.
Calendar & Contacts
The ~/Calendar and ~/Contacts folder look similar to each other.
For each account there is one main folder.
Calendar
├── private
├── dt
└── family
    └── calendar
Contacts
├── private
└── family
    └── addresses
The Emacs diary format allows for includes, so I put a diary file into ~/Calendar to ensure that all event items show
up in my Org agenda. It looks like this:
#include "~/Calendar/private.diary"
#include "~/Calendar/dt.diary"
#include "~/Calendar/family.diary"
Scheduling synchronization
The synchronization of mails, events and contacts must be done on a
regular basis. For me every five minutes is good enough. systemd is a reasonable
choice for managing user related services and scheduling tasks. You
can control it via unit files stored in ~/.config/systemd/user. For my needs I needed
three units:
notify.service is a unit used by the
other two and serves only to produce a desktop notification in case the
synchronization service failed.
[Unit]
Description=Send Systemd Notifications to Desktop

[Service]
Type=oneshot
ExecStart=/usr/bin/notify-send -a "Systemd" %i

[Install]
WantedBy=default.target
notmuch.service is repeatedly started
every five minutes, which just executes a simple command notmuch new:
[Unit]
Description=Sync and index mail with mbsync and notmuch
OnFailure=notify.service

[Service]
ExecStart=/usr/bin/notmuch new
Restart=always
RestartSec=300
RuntimeMaxSec=300

[Install]
WantedBy=default.target
diary.service serves the syncronization
of contacts and calendar items. Its complexity is hidden in a cal--sync.sh shell script which I describe in
the tool section below:
[Unit]
Description=Sync icalendar entries and overwrite Emacs diary files
OnFailure=notify.service

[Service]
ExecStart=/home/riemenschneider/bin/cal--sync.sh
Restart=always
RestartSec=300
RuntimeMaxSec=300

[Install]
WantedBy=default.target
The files are placed in ~/.config/systemd/user and can be enabled using
the systemctl command.
Tool configuration
pass
pass is an automation-friendly,
terminal-based tool for password management on Linux. Each password (and
accompanying info) is stored in its own plain text file somewhere in
~/.password-store, encrypted via a gpg public key. It is well documented, has clients
for Chrome and Firefox and grants access based on gpg-agent and a single master password
which is essentially the passphrase to a private gpg key. The only piece of configuration I had
to change was the default-cache-ttl value
in ~/.gnupg/gpg-agent.conf. Since its
primary interface is the command line it can easily be used by other
tools whenever a password is required.
mbsync
mbsync is used for synchronization of
IMAP mail folders. Its configuration lives in ~/.mbsyncrc. For each account you need to
specify the local folders, the remote folders and some rules for
synchronization between them. As an example here's my configuration for
my Gmail account:
IMAPStore falko.riemenschneider@gmail.com-remote
Host imap.googlemail.com
Port 993
User falko.riemenschneider
# contains an app password, see https://myaccount.google.com/apppasswords
PassCmd "pass private/google-mbsync"
SSLType IMAPS
# not needed, so turned of
# AuthMechs XOAUTH2
CertificateFile /etc/ssl/certs/ca-certificates.crt

# Local mailbox falko.riemenschneider@gmail.com
MaildirStore falko.riemenschneider@gmail.com-local
Subfolders Verbatim
Path ~/Mail/falko.riemenschneider@gmail.com/
INBOX ~/Mail/falko.riemenschneider@gmail.com/INBOX
Flatten .

# Syncronization falko.riemenschneider@gmail.com
Channel falko.riemenschneider@gmail.com
Far :falko.riemenschneider@gmail.com-remote:
Near :falko.riemenschneider@gmail.com-local:
Patterns INBOX Drafts Sent Trash
SyncState *
Create Both
Expunge Both
MaxMessages 0
Since Google usually requires a two-factor authentication (2FA)
you'll need to setup an app password,
which you must store (without any spaces) in a file in ~/.password-store/.
To test if syncronization works you can use a command similar to
mbsync
falko.riemenschneider@gmail.com
.
mpop
mpop is used for synchronization of
POP3 mail accounts. Its configuration file is ~/.mpoprc. Here's an example for one
account:
account info@falkoriemenschneider.de
delivery maildir ~/Mail/info@falkoriemenschneider.de/INBOX
host pop3.netcologne.de
timeout 10
user info@falkoriemenschneider.de
tls on
tls_starttls on
auth plain
passwordeval pass show private/netcologne-mail-info@falkoriemenschneider.de
keep off
To test if the synchronization works you can use the command
mpop
--all-accounts
.
msmtp
msmtp is a tool for actually sending
mail via SMTP protocol. The configuration is stored in ~/.msmtprc and looks for example like this:
defaults
syslog on

account falko.riemenschneider@arcor.de
from falko.riemenschneider@arcor.de
host mail.arcor.de
port 587
auth plain
tls on
tls_starttls on
user falko.riemenschneider@arcor.de
passwordeval pass private/vodafone

account falko.riemenschneider@gmail.com
from falko.riemenschneider@gmail.com
host smtp.googlemail.com
port 465
auth plain
tls on
tls_starttls off
user falko.riemenschneider@gmail.com
passwordeval pass private/google-mbsync
vdirsyncer
vdirsyncer is used to synchronize
contacts and calendar items via CardDAV and CalDAV protocols. Its
configuration and working files are stored within a folder ~/.vdirsyncer. As an example here is what I need
in ~/.vdirsyncer/config for synchronizing
family related data with my ~/Contacts and
~/Calendar folders:
[general]
status_path = "~/.vdirsyncer/status/"

#
# family Calendar
#

# CALDAV
[pair family_calendar]
a = "family_calendar_local"
b = "family_calendar_remote"
collections = ["calendar"]
metadata = ["displayname", "color"]

# To resolve a conflict the following values are possible:
#   `null` - abort when collisions occur (default)
#   `"a wins"` - assume a's items to be more up-to-date
#   `"b wins"` - assume b's items to be more up-to-date
conflict_resolution = "b wins"

[storage family_calendar_local]
type = "filesystem"
path = "~/Calendar/family/"
fileext = ".ics"

[storage family_calendar_remote]
type = "caldav"
url = "http://internalservername/radicale/family/calendar/"
username = "family"
password.fetch = ["command", "pass", "private/family-vdirsyncer"]

# CARDDAV
[pair family_contacts]
a = "family_contacts_local"
b = "family_contacts_remote"
collections = ["addresses"]
metadata = ["displayname"]

[storage family_contacts_local]
type = "filesystem"
path = "~/Contacts/family/"
fileext = ".vcf"

[storage family_contacts_remote]
type = "carddav"
url = "http://internalservername/radicale/family/addresses/"
username = "family"
password.fetch = ["command", "pass", "private/family-vdirsyncer"]
To test if synchronization works you can use a command like
vdirsyncer sync family_calendar/calendar.
notmuch
notmuch is a super-fast mail file
indexer and a search facility. To retrieve new mail the command
notmuch new executes two custom shell scripts (called
hooks) that I keep in ~/Mail/.notmuch:
pre-newexecutes thembsyncandmpopcommands for all my accounts. In addition it moves mails with thedeletedtag to aTrashfolder or deletes them permanently if they are older than 21 days. It recovers mails inTrashwithout thedeletedtag by moving them to the INBOX/cur folder for the correspondent account.post-newexecutes an array ofnotmuch tagcommands that attach all kinds of tags to mails according toFromorToaddresses. This makes searching for mails mind-bogglingly fast.
In addition there is post-insert which
allows you to apply tags to mails that you have created and sent.
The main configuration is placed in ~/.notmuch-config and looks like this:
[database]
path=/home/riemenschneider/Mail
hook_dir=/home/riemenschneider/Mail/.notmuch

[user]
name=Falko Riemenschneider
primary_email=riemenschneider@doctronic.de
other_email=falko.riemenschneider@arcor.de;admin@falkoriemenschneider.de;falko.riemenschneider@gmail.com

[new]
ignore=.mbsyncstate;.mbsyncstate.lock;.uidvalidity;signature-dt.txt;signature-private.txt;signature-falkoriemenschneider.txt;templates

[search]
exclude_tags=trash;deleted

[maildir]

[query]
attention=tag:unread and -tag:spam and -tag:delivery and -tag:notifications and -tag:calendar
Once you have the mail synchronization based on mbsync and/or mpop
in place and working, you'll want to include their execution commands in
pre-new. Then the main command for
fetching new mail is notmuch
new. After you have some mails in your new mail folders please
take some time to make yourself familiar with notmuch tagging and
searching. You'll quickly see that you can now work with your mail on a
different level.
i3 block for output of mail count on the desktop
I use i3wm as a window manager and i3blocks to display some information in the desktop status bar. To retrieve the number of unread mails the following script suffices:
#!/bin/bash
notmuch search --output=files --duplicate=1 tag:unread | wc -l
With this in place I can always see if there is something new by looking at the top of my screen. No notification and no interruption whatsoever. I decide when to turn my attention to it.
Emacs
There is a nice major mode for reading mail in Emacs in the package
notmuch. Please see some screenshots from their
website.
The notmuch-hello screen is basically a starting point for triggering
queries. Once you have sensible tags defined and applied them using
post-new you'll pre-define queries for
your notmuch-hello screen. You can tab between the queries or write an
individual one. When you hit the Enter key you see the query result in
an instant. You can add or remove tags to listed messages via + and - keys. Now,
you can copy a link to a mail (for me with C-x C-l) and insert it into an Org mode todo
item (for me with C-c C-l). When you need
to open the mail again as part of dealing with the todo item, just hit
Enter on the link within the item (if you have configured Org mode like
this). This kind of handling mail feels totally different compared to a
bloated reading app that has no connection to my Org.
My Notmuch related Emacs configuration is on GitHub. To support multiple mail accounts for writing and sending new mail I had to extend the default a bit.
From .ics to Emacs .diary
Syncing calendar and contact data can be done via a command similar
to vdirsyncer sync family_calendar/calendar. But Emacs Org
agenda needs event data in .diary format. To convert the synced .ics
contents to Emacs .diary format I use Emacs in a batch mode like this to
execute the Elisp function icalendar-import-file:
emacs -batch -kill -eval '(progn (require '\''calendar) (setq calendar-date-style '\''european) (icalendar-import-file "~/Calendar/family-all.ics" "~/Calendar/family.diary"))'The whole script cal--sync.sh as
referred to by the systemd user service
diary.service then looks like this:
#!/bin/bash
#
# Sync iCalendar collections and create diary files from ics collections
#

case "$TERM" in
    xterm*|rxvt*)
        NORMAL="$(tput sgr0)"
        RED="$(tput setaf 1)"
        GREEN="$(tput setaf 2)"
        ;;
    *)
        ;;
esac

reachable=$(ping -c 1 internalservername 2>/dev/null 1>&2; echo $?)
if [[ 0 -eq $reachable ]]; then
    echo "${GREEN}internalservername is reachable${NORMAL}"
    vdirsyncer sync family_calendar/calendar
    cat ~/Calendar/family/calendar/*.ics > ~/Calendar/family-all.ics
    cp /dev/null ~/Calendar/family.diary
    emacs -batch -kill -eval '(progn (require '\''calendar) (setq calendar-date-style '\''european) (icalendar-import-file "~/Calendar/family-all.ics" "~/Calendar/family.diary"))'
    if [[ $? -ne 0 ]]; then
        notify-send --category=email "Error syncing with family calendar"
    fi
else
    echo "${RED}family calendar is UNreachable${NORMAL}"
fi
This script produces one or more .diary
files that are included in ~/Calendar/diary. My Emacs
configuration for the calendar package
sets the diary-file to this location. Now Org agenda can fetch the event
data using this pointer.
Summary
It's clear from the description above that this is already a little project in its own right. If you're not into crafting with linux tools you should not embark on this trip.
I have been using it for more than a year now and it has also been through a re-installation of my Linux machine. Since it consists only of files at specific places it's fairly robust and I did not experience any major problems so far.
Reading and managing mail has become much quicker for me. With the easy link from todo items to mails, Inbox Zero has become a reality. Writing plain mail in Emacs is fine, even with attachments, but I admit it somehow still feels a bit unusual.
For the time being Thunderbird remains a daily companion but only for scheduling appointments. I didn't open its messages tab for months now.
On efficient software development
03.03.2025 PermalinkIn my previous post I mentioned the subject of efficiency as one of the five dimensions one could use to find spots where a software development project could improve, but I did not elaborate on that.
This article provides an overview of what I consider as important areas where software project efficiency is based on. For me efficient work includes and enables
- reduced waste of time,
- avoidance of rework, and
- less stress for humans.
People and the process
Let's start with the involved humans and the overall process framework. You need to have skilled, motivated and empowered people on your project. If you combine these with clearly stated project goals and a process that enables learning (like every iterative-incremental process framework does), you might just let the team run unattended. That's easy advice and the process part is really not hard to fulfill, but the people part is. In most cases you'll have a mix of experienced professionals and others that are still learning.
So, just in case you're not so sure if the team that you were able to put together choses efficient ways of getting the work done, here are some more specific ideas.
Quality, Simplicity, Complexity
The quality of your programming language, tools, frameworks and libraries is important. Avoid things that are buggy or not fit for the purpose. If you hear people complain about the need for workarounds, reasons to double check, low performance or high effort to adapt to recent changes, help the team to get rid of the cause and replace it with something better.
There is a strong positive correlation between quality and simplicity. Obviously it is easier to create a mature library or tool for one well-defined problem than for a mix of problems. If the scope of a solution is wide, web frameworks being a typical example, the necessary maturity will only come with production level use of the product (hopefully by others) and time passed.
There are, however, intrinsically complex problems that the team might face. I would count system distribution, a transactional database, product variants management or a text processing editor as examples where dragons are lurking. Some of those problems are avoidable without compromising the project objectives, others are not. The first choice should be avoidance, the second is the selection of an existing mature solution. In rare cases the team needs to come up with its very own design and implementation to solve the problem. Such cases should be treated as sources of risk with respect to budget, schedule and quality and need high attention.
Another potential source of complexity is source code and project organization: a high number of dependencies slows the team down, this applies to code as well as to an organization. Whenever there is a justifiable chance to get rid of a dependency the team should decide to do so. The idea of a high degree of decoupling is key here.
Speaking of complexity reduction by decoupling source code, I consider a micro services architecture as a potential false friend. It is true that each service implementation on its own is simple in the sense above. But the team is stepping into the realm of distributed systems, pulling in a number of problems like loosing transactional behaviour, overall availabilty, performance issues caused by extensive remote communication, maintaining runtime environment configuration consistency and so on. A distributed system can be a reasonable choice to fulfill certain non-functional requirements. But code decoupling alone does not justify such a choice. There are means like static code analysis or reviews that help avoid the proverbial "big ball of mud".
Automation
To get a version of a system up and running from implementation to deployment to testing and documentation there is a huge potential for automation of software development tasks.
Model-based software development
In case your programming language requires much ceremony to express certain aspects of your implementation (e.g. Java), a diagram- or text-based abstraction of these aspects in combination with a code generator might be justified. This type of automation requires special skills, has quite some impact on the tool chain and will only amortize in a medium to large system. I'd rather prefer a programming language where internal DSLs are a natural and emergent phenomenon or not needed at all (e.g. Clojure), but often the programming language is not a choice but a given.
Continuous integration / continuous deployment
In contrast to model-driven software development there are areas of automation that promise to quickly pay off even for small projects and systems. These are automated library dependency resolution, scripted software builds, continuous integration and deployment. Today, these practices are even summarized under their own brand name: DevOps. I hope their application is nowadays as self-evident as the use of a version control system. I'd say: a must have.
Test automation
While the definition of test cases is a demanding intellectual human task the execution of a set of these tests is a typical task for a machine. However, test code is code, which needs to be maintained just as every other piece of code. In other words: there is a cost attached to having automated tests. Therefore, careful analysis is necessary to decide where and how to apply automated testing. I consider the following criteria for making decisions when looking at a specific part of the system:
- Algorithmic or logic complexity
- Stability of the requirements that guided the implementation
- Risk of breaking existing functionality
- Effort involved in setting up the tests
- Cost or damage in case of bugs or unwanted behaviour
- Effect on ease of refactoring or even rigidity regarding change
In general, the higher the testing level is on the testing pyramid the more expensive is the creation and maintenance of an automated test suite, unit tests usually being the cheapest.
In addition keep in mind:
- Trying to make pieces of code available for unit tests fosters decoupling, which is a good thing.
- Having some automated tests that don't just target single functions or classes in isolation, but include the integration of some important parts of the software brings a lot of confidence when refactoring is due. In other words: the absence of such tests could be a constant obstacle to fixing broken windows.
Here are some examples regarding automated testing of typical parts of a system together with a brief assessment:
- Non-trivial calculations or logic are almost always worth covering with unit tests, even if requirements could change.
- Testing database access that is implemented in a CRUD (create, read, update, delete) fashion is in many cases not justified.
- But complex database queries, subject to change in the future, could be rewarding test objects, even if there is some effort involved to prepare the database data.
- A user interface (UI) that is used by thousands of people in production, but is not subject to change anymore, might go without automated test coverage.
- A user interface in the early stages might not be stable enough before usability tests have been conducted. The existence of automated UI tests could then create barriers regarding the improvement of the UI, which is eventually detrimental for usability.
- But once existing UI functionality is confirmed and used in production by a significant number of users AND the product is still being extended, automated UI testing becomes a must have.
- A public REST API of a system that an unknown number of clients depend upon might be a very worthwhile test object.
Documentation
A fourth area of automation can be found where documentation needs to be provided:
- A very common practice is the generation of API documentation from comments written in source code.
- For HTTP based REST APIs the use of OpenAPI merges documentation with a tool for experimental exploration of a machine-machine interface by humans, an optimal combination to make the API learnable.
- A database schema is a useful starting point and important ground for understanding how a system works. When the DDL carries comments they can be used to auto-generate a kind of poor mans data dictionary. In addition the references between tables could be used to auto-generate an overview diagram.
Infrastructure automation
Another area: A team creating a distributed system will have to deploy the subsystems to distinct nodes, which have to know each other in order to cooperate. For integration or testing purposes there is usually more than the production system, and the task of consistently configuring all subsystems on all these different runtime environments is often tedious and error prone. So this makes another area for automation of the infrastructure setup using formal descriptions of necessary containers, software versions and so forth.
And last but not least, monitoring automation should be applied to collect and evaluate data and events from production systems in order to learn about performcance, chances for optimization and all kinds of other numbers.
Risk-based application of software engineering methods
If you take a look at the 15+ knowledge areas of software engineering methods in SWEBOK you might feel a bit intimidated.
As a software professional I'd like to be acquainted with the methods considered best practice, but does this mean that a team should implement all of these on its project?
To find a way to an answer, imagine an efficient project organization for a very special case: Creating a software tool for yourself. You are the sponsor, sole source of requirements, programmer, tester and user. Even in such a case there are certain practices you might want to keep, like using a tool for version control or automated build and some unit testing. But you wouldn't consider a stakeholder analysis, or explicit requirements or test management, let alone a formal configuration management audit.
In this special case there is no need for many of such tasks because there is no risk involved if you skip the formal execution of these tasks. To the contrary: you would waste your precious time for no other reason than maybe a good conscience.
Therefore my advice is to regard process frameworks and well-known methods as store shelf with offers. The team should take a look at each item and ask itself: "What happens if we go without?" It should pick only those ideas that will pay off in terms of risk reduction, or add very little overhead.
There are, however, some disciplines where the likelihood of damage is high and its detection usually happens too late to keep the project out of serious trouble. These ideas should only be ignored if the team has good reasons to be sure it will not be bitten by possible consequences.
Among them is usability engineering, i.e. learning about the context of users, getting a deep understanding of how they need to do their work and testing the software accordingly by letting real users work with it. I've seen enough projects where the team and client representatives had only a deceptive idea of how the product would be used, leading to poor productivity in the field. Building the wrong tool for users is most efficient only if your goal is to throw time and money out of the window.
Another area where I would usually advise against its omission is the elicitation of architectural drivers like non-functional requirements, system context, constraints and so forth. Wrong technical decisions could be the cause for a major re-write of parts of the product in the future, once the mismatches become obvious.
And a third area whose omission might lead to an unpleasant surprise late in the game is overall software testing with realistic data (in terms of quantity and characteristics/variants). Because the devil is in the details, numerous edge cases that a system must handle before it can be used in production might only become visible when real-life data is processed.
In addition a team should treat defects rigorously because it is well-known that system parts that show unwanted behaviour in some respect are potentially also infested with problems in other respects. Defects should therefore be treated with a zero-tolerance mindset. They have to be tracked using bug tickets and need to be eliminated as soon as possible.
Whenever a team is about to skip any of the above it should have good reasons to do so.
In closing
To sum it all up: to work efficiently requires skilled people that quickly learn what is necessary to meet the projects objectives. They pick the right tools, abandon the bells and whistles and strive for a high degree of automation where it pays off. Not surprisingly, this observation applies to software development as well as to any other creative or artisan work.
Five dimensions of software project health
08.02.2025 PermalinkA software project is usually a complex endeavor spanning several months or years, requiring expensive expenditure of human labour. Many aspects are unique: the customer, the product, the composition of specialists, the challenges, chances and risks and so forth.
So it's no wonder that each project follows its own path, makes its own rules, distributes responsibilities in different ways. Many projects may officially adhere to a documented process framework like Scrum or whatever a company has decided to use. But at the operational level, they have to work in their own style.
So how can one judge if a project team is on its way to success or headed into trouble, when adherence to a process framwork (or lack thereof) is no useful indicator?
In order to examine for when a project team needs to review the way it works, I found much benefit in the following five dimensions:
Product Quality
If the product released by the team is in poor shape then something needs to change. Poor quality can manifest itself in frequent occurrence of bugs, change requests that point to fundamental traits, users complaining that their work is hampered, low performance on reasonably sized inputs or high effort to implement seemingly simple changes. The cause of poor quality may be time pressure, a low level of expertise or morale, a lack of understanding about user needs or simply skipping standard quality assurance steps like reviews or tests.
Stakeholder Satisfaction
The outcome of a software project usually affects different groups of people. For example there is the paying sponsor, subject matter experts, one or more user groups, possibly a work council, IT operations and last but not least the development team. Each group sees the project from its own angle, each individual has its own perception. The likelihood that something is actually broken is high when one or more stakeholder representatives express their concern.
Transparency
The management overseeing the project will have a hard time trusting the project team when its work is kind of opaque. Good project management will bring light to actual progress, budget consumption, spotted risks and problems, next milestones, task assignments and so forth. If the management feels a lack of transparency then the project team should change its habits.
Predictability
The more uncertainty there is the harder predictions are, especially those concerning the future. Uncertainty in the very early days of a project is usually high, therefore one important first task is some exploration to reduce choices and risks. However, at some point in time the project team will have to provide estimates about effort and attainable milestones. Going forward, if the team repeatedly misses milestones that were set based on its own estimates something needs to change. The project may have dependencies which it can't control, ever changing requirements, or the methods for the collection of numbers about the past and creating estimates for the future might need improvement. In any case the project management must adapt its modus operandi to regain their stakeholders trust.
Efficiency
Finally, even if all people affected by the product feel satisfied, the project team is able to live up to its promises, the management feels like it has enough insight and control and the product meets its requirements, there's a chance that time and budget are wasted for no good reason. Consequently, questioning habits, tools and technologies should be part of a well-formed closer look at how the product is developed from requirements to release.
In conclusion
A regular retrospective, as it is recommended in Scrum projects, is a good occasion to think about how the team is doing in light of the five dimensions explained above.
If it ain't broken then don't fix it. If the team is successful according to the five dimensions, then congratulate them and let them do their work, because it simply doesn't matter if the way they work complies to a given process framework.
Emacs Org Mode and Getting Things Done (GTD)
30.09.2023 PermalinkA few hundred years ago only a small minority of human beings were able to read and write, enabling them to exchange and preserve information. However, to live a more or less happy life most people didn't need this skill.
Today the picture is completely different. Finding, consuming, processing and creating information is front and center for many jobs. In addition, many professions require highly specialized knowledge and experience. To be productive as an organization effective communication among specialized workers is important. Those who are nowadays unable to fluently read or write are effectively excluded from the information age and won't be able to work in these jobs.
To sum it up: literacy - a human cultural achievement which was once dispensable for the majority of humans - has become a vital basic skill.
Why personal task and knowledge management?
It is an interesting question if there are practices today that you could consider as dispensable and are therefore not widespread, but which might be vital requirements in the future, similar to what literacy has become today.
Effective personal management of a high number of tasks and amounts of information might be one of those skills.
As an illustration: Creating software is certainly one of these jobs that are typical for the information age. Everyday many of us are faced with a constant influx of information and requests to do something, and we, too, often need the help of co-workers or information and decisions by clients. Yet, since our brain cannot handle two or more things simultaneously, creating a new solution (or a part thereof) requires times of undivided focus, where we need to stop any distraction from the outside and from ourselves, in order to truly understand the problem and formulate a possible solution.
Therefore the active management of my own time, tasks and information seems to me as if its mastery is already today a big advantage to be collaborative and productive without putting your health or the quality of your work at risk. Those who face a high load of tasks and/or information influx and try to do without any kind of disciplined approach seem to be at a disadvantage.
From paper-based notebooks to Emacs and GTD
I started my personal task management journey while working on a long-running software project around the 2000s by using a single A4-sized notebook. I had to learn a considerable amount of project specific information and needed to remember all of my own tasks, as well as commitments by others. So I tried to write down as much as possible during and after meetings and looked into my notes several times a day to make sure that I won't miss anything. This habit was far from being perfect but it brought me through the time without going nuts. Since then a paper-based notebook remained a necessity for organizing my work. For recurring items I tried calendar events with mixed success. However, I did not use any kind of task organization for my private life.
Fast-forward to today a lot has changed. I started using Emacs for programming in Clojure in 2012. With Emacs comes Org Mode but I used it merely for occasional note taking, ignoring its vast capabilities. And only one or two years ago, as I felt that I needed to improve my personal habits a bit, I came across "Getting Things Done" (GTD), an approach published by David Allen in 2001. Although there are nice online guides available which present the essential ideas, the book itself is worth reading and contains quite some insights from Allens work as a consultant in these matters. I decided to give the method a try and adopted it for organizing my entire professional and my private life.
Org Mode and Getting Things Done: a mapping
To implement GTD with Emacs and Org you need a conceptual mapping of Allens ideas and suggestions to terms and features that Org Mode offers.
Here is what I came up with:
- A GTD item, usually a task, is an Org headline level 2 or 3 starting with a TODO keyword.
- GTDs lists for "next action", "waiting for" and "someday/maybe" can be mapped to a keyword like NEXT, WAITING and MAYBE.
- The Org Mode category nicely matches a GTD project or area like for example a customer, a specific hobby, domestic work, gardening, bicycle maintenance etc. By default an Org file establishes a category, so a reasonable approach would be to have one distinct Org file for each project or area. Then Org agenda is the key to bring everything together in one view with a timeline.
- The numerous lists GTD encourages you to maintain can be realized by
using Org Mode tags in conjunction with
org-sparse-tree. - In addition, Org Mode tags with a leading
@character can symbolize a GTD context, like a place or a person. - org-capture is a literal solution for putting new stuff into an
in-tray file, stored there for a subsequent organizing step. I
maintain an
inbox--todos.orgfile for this purpose. - Org headlines can carry a deadline or scheduled date. Together with the Org agenda view you have a very effective tickler file.
- For regularly recurring tasks you can attach a repeater specification to a date.
- Org Mode also supports checklists that are mentioned in GTD to support yourself when conducting more complex recurring tasks.
- And if a piece of your stuff is not actionable then it could be
valuable information that you want to store for future
reference. Because of this I maintain several
*--notes.orgfiles that keep all the non-task stuff.
Find my Emacs/Org configuration on Github.
Effects on my daily life
Managing my whole stuff, professional and private, only takes me 5 to 10 minutes each day. I do a brief review once a week, usually during the weekend. Putting everything into Org and using the Org agenda creates clarity in my life about "what's next". Now I can literally see in the Org agenda if the upcoming days promise to be stressful or easy, and I can shift things to balance the load, taking my personal level of energy into account. If I have to wait for someone before I can continue on a task I use the WAITING state and move the scheduled date to some days in the future. If a task is running longer I attach notes to it so I can easily recall later what the status is. Because of this it is no burden to have 2, 5 or 10 projects in parallel, because I am allowed to forget almost everything about them until a related task shows up in my agenda again.
This "permission to forget" regularly gives me inner peace, so I can take my time and exclusively focus on finding a solution for a customer, or to go on auto-pilot when getting things done at home.
Being sure to never forget anything and being able to react to forseeable congestions gives me so much confidence and control that I eventually started new personal projects. The mental relaxation helps me getting more things done than before, without increasing my level of stress.
My quest for the ideal keyboard switch
01.06.2021 PermalinkLast year I built my first ergonomic mechanical keyboard with brown (tactile) switches. After an initial phase of training I am very happy with the layout and keymap. Typing has become much more relaxed, there's no need to ever look at the keyboard to find a key, and my hands always remain in the same position.
There is actually a wide variety of keyboard switches out there so as I was striving for the perfect personal keyboard experience I was curious about how other switches felt like.
So, I used the last 12 months to build 4 more boards with the exact same design but different colors of acrylic plates, a pair made of poplar plywood and different switches. Here's how they turned out:
 Dark anthracite acrylic plates, Cherry MX Red switches
(linear 45g, lubed). Never thought that I appreciate linear switches
that much.
Dark anthracite acrylic plates, Cherry MX Red switches
(linear 45g, lubed). Never thought that I appreciate linear switches
that much.
 Translucent acrylic plates, covered by a stickerbomb,
again Cherry MX Red switches
(linear 45g, lubed). Initially, I didn't plan to cover the
board with stickers. But unfortunately, the glue created an ugly
look on the translucent plates so I used the stickers as a rescue.
Translucent acrylic plates, covered by a stickerbomb,
again Cherry MX Red switches
(linear 45g, lubed). Initially, I didn't plan to cover the
board with stickers. But unfortunately, the glue created an ugly
look on the translucent plates so I used the stickers as a rescue.
![]() Poplar plywood clear coated, Cherry MX Black switches
(linear 60g, lubed). This very light wood makes the keyboard
weigh only 280g. It is very quiet and I use it while sitting
on the couch.
Poplar plywood clear coated, Cherry MX Black switches
(linear 60g, lubed). This very light wood makes the keyboard
weigh only 280g. It is very quiet and I use it while sitting
on the couch.
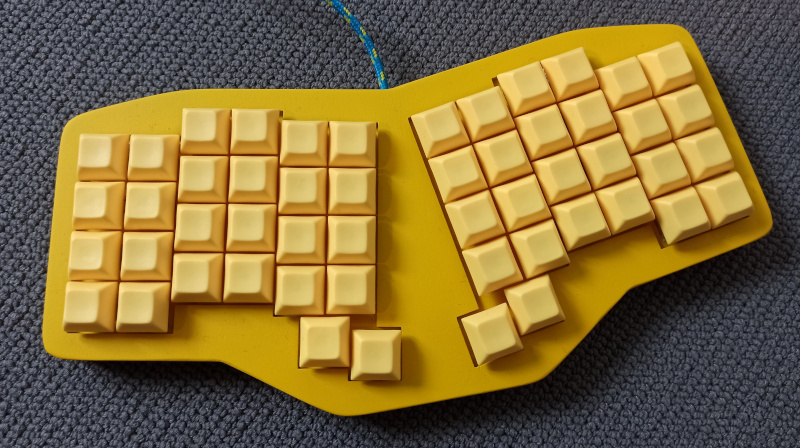 Poplar plywood yellow painted,
Kailh Speed Copper switches
(tactile, 50g, shorter travel distance, lubed, dampening
O-rings). Actually much more tactile than any MX Brown or
clone. The typing sound is considerable though. This is now my
daily driver in the office.
Poplar plywood yellow painted,
Kailh Speed Copper switches
(tactile, 50g, shorter travel distance, lubed, dampening
O-rings). Actually much more tactile than any MX Brown or
clone. The typing sound is considerable though. This is now my
daily driver in the office.
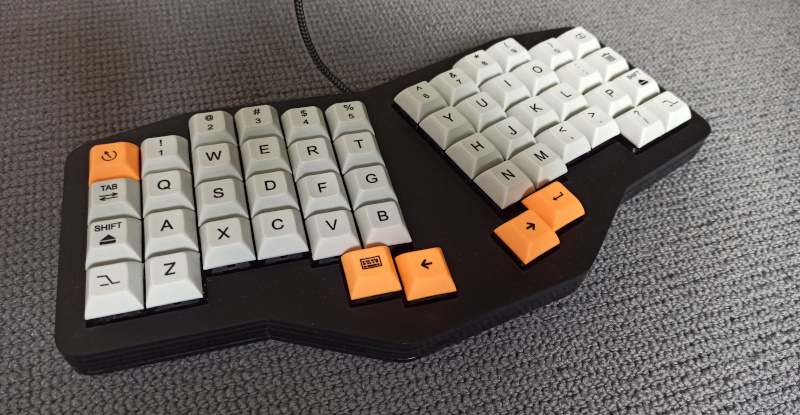
 And here's my first build again with white acrylic plates. I replaced the
brown switches with Kailh BOX White switches
(click-bar, 55g, shorter travel distance, dampening O-rings)
to see if I like the sound and feeling. To me, in terms of
clickyness it is by far superior to any click-jacket based
switch like MX Blue or clones.
And here's my first build again with white acrylic plates. I replaced the
brown switches with Kailh BOX White switches
(click-bar, 55g, shorter travel distance, dampening O-rings)
to see if I like the sound and feeling. To me, in terms of
clickyness it is by far superior to any click-jacket based
switch like MX Blue or clones.
While it is fun and relaxing to build these boards it also served a serious purpose: find the ideal switch for me. Impressions from typical switch testers are limited because you can't do actual work with one of the switches.
What did I learn about switches and what type do I like best?
- MX Browns or clones are very popular and I used them myself for many years, but they are not really tactile. It is worthwhile to compare them to linears or more 'modern' switches like Kailh Speed Copper.
- MX Blues, known to be the clicky switches, are actually mushy compared to click-bar based MX style switches of the Kailh BOX series. If you're into clicky switches then I strongly recommend to give them a try.
- My fingers tend to bottom out on linears, so I always get the 'clack' and a physical feedback, plus I like the smoothness. Thus, I prefer a lighter linear switch over a clicky one for fast writing. For a more relaxed and quieter operation in the evening I find MX Blacks with their higher resistance more pleasant.
- I am fastest on Kailh Copper Speed, and their tactility often prevents me from bottoming out, so the actual travel distance is by far shorter compared to all other switches I used so far. However, they're by no means quiet switches.
- I don't play any computer games. Therefore I can't tell which type of switch might be the best for me in such a setup. The general opinion is that light linears are the typical choice for gamers.
My very personal summary for the time being: MX Blacks are my leisure time switches, but for serious writing I use Copper Speed or MX Red. But who knows? There are still many more switches to try, so maybe I'll do some more builds just to find out.